
INSTALLATION GUIDE FOR APPIUM
1. Download and Configure Java
Go to URL: www.oracle .com > Download JDK
Even if JRE is installed, JDK is needed.

Note : Java 8 is not supported, so please download lower versions.
a. Go to Control Panel > System and Security > System
b. Tap on Advanced system Settings in left options.
c. In System Properties windows that is popped up, click on “Environment Variables” button.
d. In System variables panel, click on “New” button. Following window should pop up.
e. Put Variable Name as JAVA_HOME and Variable value as the path where JDK is installed, as shown below :
f. Edit “Path” variable and add the same JDK path at the end of its value with a Semi colon as below :
Note : Please handle Path Variable carefully, because any wrong changes in the same may interfere working of your machine.
g. Once the changes have been made, Open command prompt and enter command “java –version”, if the result shown matches as shown below in the screenshot, it tells that java is successfully installed in your machine :
3. Configure Environment variables for JRE (It’s an optional step, but good to do for safe side.)
a. Please follow the same steps as mentioned in Step 2 for creating new variable and editing path variable.
b. For JRE, Variable Name = “JRE_HOME” and Variable Value = Path of JRE folder in computer.
4. Download and install Android SDK
Go to URL – https://developer.android.com/sdk/inder.html?h1=1 to setup all configuration.
Since we are testing only, even than we need SDK, this to set up all our configuration. If we have configured SDK, then only Appium can interact and execute android related apps.
5. Configure Environment variables for Android SDK.
a. Please follow the same steps as mentioned in Step 2 for creating new variable and editing path variable.
b. For Android ADK, Variable Name = “Android_HOME” and Variable Value = Path of Android SDK in computer.
It appears something as shown below :
c. Edit “Path” variable and add the same SDK path at the end of its value for tools and platform-tools folder, with a Semi colon as below :
Path Value should be followed by the following value: ;%ANDROID_HOME%\tools;%ANDROID_HOME%\platform-tools
It should be visible something as below :
d. How to verify Android SDK is successfully configured :
Go to command prompt and type command: “android” and hit enter. It android SDK manager opens up, that means android SDK is successfully configured.
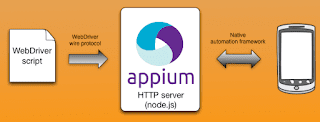
6. Download and Install Appium
We need to download and install several pre-requisites
a. Node.js : https://nodejs.org/download/
Download the suitable one (.exe file) and install the suitable one, as per your laptop. Once done, open command prompt, type “node” and press enter. If it appears as below attached screenshot, it means node.js is successfully installed in your system. Since, it is .exe file, it will automatically set path variable.
b. Download and install .NET Framework. : https://www.microsoft.com/en-in/download/details.aspx?id=30653
Appium opens a UI portion as well, for which .NET framework is required.
c. Download Appium : http://appium.io/
Appium Version to be downloaded: 1.3.4.1
We need not install Appium, on double clicking its .exe file, it will open Appium server, where we need to start to move forward with our execution.
7. Download and install Eclipse : https://eclipse.org/downloads/packages/release/Luna/SR2
Jar files to be imported in the project in eclipse are depicted in the following screenshot.
Same can be done as follows :
Right Click on project name > Build Path > Configure Build path
Links to Download jar files are as follows :
a. GSON jars : https://code.google.com/p/google-gson/downloads/detail?name=google-gson-2.2.4-release.zip&
b. Appium Client Libraries (java-client-2.2.0) : http://mvnrepository.com/artifact/io.appium/java-client/2.2.0 (Click on Download Jar button)
c. Selenium Server : https://selenium-release.storage.googleapis.com/index.html?path=2.42/ (Download selenium-server-standalone-2.42.2.jar)
d. Ojdbc6 : http://www.oracle.com/technetwork/apps-tech/jdbc-112010-090769.html
e. TestNG : http://www.java2s.com/Code/Jar/t/Downloadtestng685jar.htm (Download TestNG 6.8)
8. Plug-ins to be added in Eclipse : Open Eclipse > Help > Install New Software > Enter the Given URL (one-by-one) in Work-with textbox and hit enter.
a. DDMS (For Android Device detection) : https://dl-ssl.google.com/android/eclipse/
b. Maven : http://download.eclipse.org/technology/m2e/releases
c. TestNG : http://beust.com/eclipse


No comments:
Post a Comment